My online portfolio: Malotke Designs.
Showing posts with label Progress. Show all posts

Monday, June 4, 2018

Aspen Tank Pattern Testing

Usually I make my own patterns and avoid using commercial patterns. I prefer making sure everything fits the way I want it to and then I don't need to make alterations like I do with commercial patterns. Plus, it's fun to drape and pattern from scratch. But I'm looking to expand my wardrobe and try to make more practical clothing that I'll wear instead of just fancy things that sit in my closet. 

I've been trying to be more involved in a sewing community, especially since I'm in between costuming projects (my latest show doesn't open until September). So I joined Seen & Sewn's Pattern Testers group and tested out the Aspen Tank

Here is my progress:


I am a fabric hoarder and love buying fabric even if I don't have a set plan for it. So after getting the Aspen Tank pattern I decided that the striped fabric I had been playing around with draping would be perfect. 


After cutting out the pattern pieces, taping them together, I started to pin the pieces. It's a super easy pattern, just 3 pieces if you decide to do it without sleeves (which I did). Just a front bodice, back bodice, and bottom piece. Usually with patterns I like to line everything up, but with this I wasn't too worried and figured the stripes would look great not lined up. 


I made the front and back bodice with vertical stripes and did the bottom with the stripes horizontal. It's a nice pattern because, based on your size you need less than 2 yards, which is perfect if you like using remnants like me.

I made a Large even though some of my measurements fell into the X-Large range.


Now another change I made was opting for double fold bias tape because I wanted the arm holes and neckline to be outlined in a solid color. Plus, it added a nice clean line around the bodice. Pictured left is me adding the bias tape.


Pictured right is my final bodice in play. It's perfect for the summer. Lightweight and comfortable. I have to wear a sweater to make it more professional for work, but it's great by itself with jean shorts for this summer weather we've been having.

I would recommended this pattern to anyone looking for a fun summer top! It's a nice flowy option, so depending on how heavy your fabric is it's great for the hot weather. As of now I am planning to remake this top with a different fabric for another fun summer option. If you're interested in giving it a shot check out Seen & Sewn Patterns.


Saturday, August 26, 2017

Costume Design for a Cast of 40+

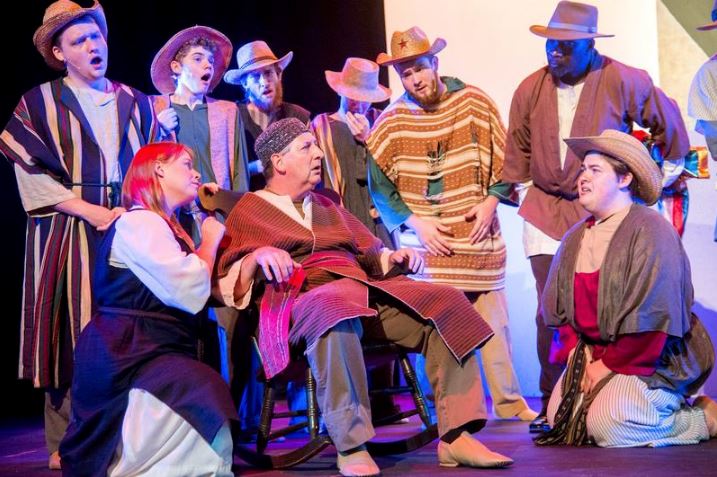
Sorry for the lack of posts recently, I have been very swamped the past few months with a huge costume design project. I was lucky enough to get to be the Costume Designer for "Joseph & The Amazing Technicolor Dreamcoat" for the Champaign-Urbana Theater Company. With a budget of $500, two months, and a cast of over 40, I needed to make this production come to life. 

I had a lot of fun working on the show, especially making the dancers' looks. I'm going to try to post some progress pictures for the pieces I made from scratch. I loved working with quick changes, multiple costume changes, and a cast this large. My first show as a designer I only had 2 actors (they played all of the characters of course) to work with, so this was quite a step up from that show. I look forward to working on more shows like this in the future. I was very thankful to have a few people help work on some pieces for the show and to have some help backstage for changes and costume needs.

Stay tuned for more pictures! You can always check out my portfolio for more pictures too!

Ensemble in motion.

Close up of the Pharaoh's cape while backstage.
  
During "One More Angel," we had a hoedown feel to the cast.

Tuesday, January 24, 2017

Denim Jacket Update


Progress Picture.
Whenever I have some free time I try really hard to work on the many projects I've started and stopped. A while ago I had purchased some more patches for my jean jacket, however they've just been sitting around waiting to be ironed. Since I don't work until later today I decided why not add some more patches to my jacket?! So I put a Harley Quinn patch on the bottom left with a "KAPOW" patch right next to it that has a little Batman symbol inside the "O."

Front right pocket.
Then I added a "KABOOM!" patch on the right pocket flap. I had gotten a set of 6 little patches similar to these 2 so I plan on using at least a 3rd one for the jacket. I may save the others for future projects. When I had started this project I looked through all of my sewing stuff to see if I had an patches before going out to buy some. I only had a packet of 2 little green flowers. I figured since I've had them forever I might as well use 1 of them, so I placed it on the flap with the "KABOOM!" patch. I think it looks pretty neat for the front. I haven't decided on purchasing nay others as of now or where to put the other little ones I already have ready to go. I'm pretty excited about the progress so far and I look forward to coming up with new ways to alter this jean jacket. I am considering putting a lining in (minus the sleeves) for some more color/pattern. We'll see what happens!

Sunday, December 25, 2016

Adding Patterns!

Cutting triangles.
My denim jacket has 1 patch and a little extra stitching around it, but since I don't have any other patches at the moment, I decided to add something else to it. Being me I thought a little bit of a pattern would make this denim jacket really stand out. I went through my scrap bin to see if I had any that would work for the under collar of the jacket. Of course the piece that ended up working is a piece from my Senior Collection. The red, black, and white plaid fabric has the perfect amount of stretch to work with the denim (72% Cotton and 18% Polyester). Being me I didn't measure anything out, I just lined up the selvage with the collar, pinned it, and sewed along from the inside of the jacket. 

Pinning the remaining 3 edges.
After attaching the plaid to the jacket I cut a few triangles to give the fabric ease along the neckline. Adding an under collar to an already made piece isn't as easy as doing it in the proper order while making a jacket. Next I pinned the plaid to the collar so I could hand stitch it around the 3 edges. Surprisingly it didn't take very long and it turned out pretty well. You can't see the plaid unless the collar is up or turned wrong but I know it's there and I think it's a pretty great detail to my jacket. 
Finished Collar.

I'm considering adding a different plaid (because I have SO MUCH SCRAP FABRIC) to the cuffs so if I roll the sleeves up and button them you'll get some more pattern and color. Overall I'm pretty happy with the progress of my jacket. Hopefully I'll get some more patches within the next couple of weeks and i can continue adding to the jacket.

Denim Jacket: First Patch Down!

Ironed on, about to start stitching.

First patch on my denim jacket is complete! I started off my denim jacket project with just a vague idea of what I wanted the end result to be but it's already changed multiple times since I've begun this project. After purchasing the denim jacket from work I went to check out the iron on patch selection at Jo-Ann Fabric Store. I was slightly disappointed but ended up purchasing a Wonder Woman patch for my jacket. 

My project has just been in that state until today. That's the funny thing about Christmas time for me, I always get these bursts of energy to finish projects and start new things. So after our Christmas celebrations I figured why not work on the jacket. I ironed on the patch and then, wary of the corners, decided to hand stitch the corners down so it will survive being in the washer. 

Final picture of the patch
with stitching around it.
Originally I was thinking of using thick embroidery thread and stitching a few onomatopoeia words like "POW!" and "BAM!" around it but decided on a simple outline to highlight the patch. I'm putting the comic book references on the back burner until I get more patches for my jacket. I don't think it will be an entirely superhero themed jacket, but it may turn out that way depending on the patch selection when I go shopping. I have found a few online I think I'm going to buy and they're all movie references so it could turn out pretty neat (at least to me).

Wednesday, December 21, 2016

Denim and Patches

Denim and Patches

Denim and Patches by brimalotke featuring a denim jacket

I'm trying to decide if I want to go with a theme for my own personal denim jacket & patches project or if I should just whatever patches I like and end up buying. Currently I just have the 1 Wonder Woman patch and I want to do embroidery around each patch. I may just have to roll with it and get any patches I'm able to that I like.

Project Costs so far:
Denim Jacket from 2nd hand store= $7
Wonder Woman Patch from Jo-Ann= $4

A lot of patches I've seen that I've liked are around $8/patch so this may get a little expensive. However, if I get them one at a time over a few months and gradually just keep adding them on it won't feel like I'm spending so much on the project. Plus there will always be coupons, discounts, and hopefully some great end of the year sales!

Friday, December 2, 2016

Embroidered & Patch Jacket

For my job as a buyer at my work we needed to do a mall visit, take notes, read the trend reports, take a quiz, and in general just discuss what we were seeing in the different stores. One of the things I loved was the bomber jackets with patches. I like the variety in the different stores and I like the overall idea. It's fun and can work for different styles. However, I just can't find one that really speaks to me. I want to pick the patches and the colors and so now I'm making my own jacket. I am pretty busy at work so I'm not starting from scratch. Also since I prefer the jean jackets to bomber style, I picked up a dark wash jean jacket from work and am ready to transform it into something spectacular...or at least have a lot of fun trying new techniques. 

I snagged a Faded Glory dark wash denim jacket at work and then proceeded to check out what patches Joann's had in stock. I wasn't a huge fan of the selection but they've been having so many sales recently I don't blame them for the low amount. Plus, I really just wanted one to start with because I want to try and snag some online. I plan on distressing the collar and cuffs and potentially adding a lining (at least to the cuffs so if I roll them there's a pop of pattern). Anyone who has seen my work knows I love patterns so obviously I need to add more to this jacket than just patches. I don't want to go overboard, but I plan on adding some hand embroidery (or machine since mine can do that!) around some of the patches. 

I had a Batman patch but I used it for my graduation cap...so Wonder Woman is the start of my jacket progress. As usual we'll see what happens. I'm just happy to start another project and it'll be fun to wear it around and show off my personality with my jacket. I'll post progress pictures along the way and if I do the distressing I'll share the methods and maybe have a step-by-step guide as well. 

Thursday, July 14, 2016

Update!

It feels like I haven't posted in forever, but I've been insanely busy with costumes for Oklahoma!

We open the first week of August and we're trying to do fittings with EVERYONE this coming Saturday. However, because of my work schedule I won't be able to be there and since I work Friday as well all of the costumes I've been working on need to be dropped off tomorrow morning...so I'm feeling a tiny bit of pressure. I've had the costumes since Monday morning but I haven't really had a chance to work on them between work and unpacking in my new apartment. I'm sure I'll get it all done it's just a matter of how late I'll be staying up or how early I might need to wake up to finish...

As of now I've seam ripped some ribbon trim, a lace ruffle trim, and 2 sleeves. 
Next I'll be cutting and sewing the 2 sleeves on to the blue dress. Then I'll probably go ahead and sew the purple gingham skirt back together (My boss had seam ripped all the seams so that they could be sewn to make the waistband a little bit larger). After that I will either sew this ruffle thing on the bodice of the 3 look or cut and sew the ruffle for that look. After that it'll just be a matter of closures/trim. So overall I feel pretty good about my time and where I'm at with these projects. I'll post some pictures when I get a chance (probably Saturday/Sunday since I close tomorrow).

Friday, July 1, 2016

Okay Oklahoma!


Progress Update on Oklahoma!

All the prairie dresses are sized, organized and mostly pulled. The female ensemble's dresses are pulled, along with children and the dancers' prairie dress looks. We still need the dancers' ballet and can-can looks. We also found a great dress option for one of the leads. This week has definitely been eventful and lots of progress has been made for the costumes for the show. The show starts in about a month and I think we're doing pretty well overall. We've sized the cowboy shirts and we've pulled some leather and suede vests and jackets for some of the guys to try. I'm excited to see everything come together.

Wednesday, June 8, 2016

Kimono Sleeve Robe

For "Ariadne" my team constructed a blue velvet, blue satin lined, robe with kimono style sleeves and blue floral embroidery details. It's stunning. The picture you see to the right is me trying on the muslin mock up....which I get to keep! I plan on first finishing all of the seams and then hemming it. Next step will be to wash it because I want to try my hand at dying it. I think I want a rich maroon color, but we'll see what happens. I plan on adding some details like the embroidered flowers or some strips of patterns. I might even throw a lining in for the heck of it since we have the patterns still. But I might be starting a different project before doing all of this to the robe.

Projects Update

Since work in the shop is slowing down I've decided to start up a project. Hancock Fabrics is going out of business here in St. Louis so I went and got some cool things to start working on during my last few days. I did buy a dress pattern and I'm think about trying to go ahead and do that, but I might make a shirt instead with a visible zipper down the back and save the dress for when I can just sit down on a weekend and do it all at once. I bought black fabric with red hearts for the dress and a black with deep red roses for a blouse. I of course then caved when I saw a black and white plaid hounds-tooth with thin pink stripes and bought 3 yds to make a skirt & vest combination. I'm pretty excited about getting back into making my own things and I have a LOT of fabric and materials at home that I can use when I get settled in IL.
I plan on starting a project tomorrow so when I do I'll take pictures and do a step-by-step post with tips and such. So stay tuned for actual exciting posts. Work has been unexpectedly busy these past few weeks so it'll be nice to return to blogging and getting new material for my blog and my website!

Tuesday, April 19, 2016

Opera Theatre of St. Louis: Being a First Hand

I've finished my second day as a first hand for the Opera Theatre of St. Louis. It's been pretty great and very busy! For my first day we had orientation and then I spent the next few hours working with my draper at collecting fabrics and getting information on different pieces. I patterned a cloak piece and then cut out 3 of them! Two of the cloaks needed extra pieces so I cut those as well. I did manage to get a hood cut out as well using an already constructed hood as a pattern. For today I managed to get the other cloaks' hood cut out and even the 4th cloak's hood cut out after we washed and dried the fabric (it had majorly shrunk).

Working on Macbeth.
I also pressed and rolled a lot of fabric today since my draper didn't have more patterned. I did mark and cut out a tunic for Macbeth. I also helped cut some other fabric to get ready for our last cloak. We had meetings after lunch so I didn't have a full day's work. I did hand sew some tags in one of the cloaks that have an unattached hood. It was how I spent my last 10ish minutes at work. 

Overall I'm really enjoying working as a First Hand. I don't think I would enjoy being a costume technician as a full time career, but this is pretty exciting and I like working on multiple productions at once. It's fun and keeps things going. I'm excited to participate in the apprenticeship program here as well. It'll be a very busy 2 months and I'm really glad I have this opportunity in my life. It's just a great experience!

Wednesday, April 6, 2016

New Website

One of my classes this semester is Portfolio. For our final project we have to make some type of portfolio combination that illustrates our work and such. I've chosen to take it all digitally and create a new website now that I have some pictures of my senior collection. I'm pretty happy with it so far, but am still making some changes. I don't have all the pictures from the fashion show so I'll be adding a lot more once I have them.

Interested? 
Check it out here: Malotke Designs

Monday, April 4, 2016

Gabby in Action

Gabby wearing my finale piece: 


The look consisted of a black and white plaid dress with a red visible zipper down the back and black rib knit around the armholes and collar. The bottom of the dress is black chiffon that was tied up around her waist until a certain part of the song when she would then untie it to reveal that it's a floor length dress with a front slit. 

The corset has a black visible zipper down the front and a soft grey cotton trim along the top of it. The panels are made from the different plaids from the rest of the collection with black cotton for the front and the black and white plaid from her dress for the back panels. The inside of the corset has black, white, and red ribbon for the taping of the bones. 

I made the headpiece in London at the London College of fashion for my final piece for my Millinery course. It's a black wool piece that I covered by hand sewing black fabric (that has a shine and a ripple texture). I hand glued all of the red swarovski crystals to the veiling and then sewed the veiling on to the piece. I dyed the ostrich feathers red, curled them, and glued & sewed them to the side. For the final touch I added a white and black butterfly I bought at the Alexander McQueen exhibit at the V&A to the side on top of the red feathers.

Picture courtesy of Brian Powell "Fashion Show Freebies." 

Senior Collection: Finished!

Pictured L/R: Tim, Eric, Sarah, Gabby, Brianna (Me), Dairius, Megan, Kevin, Greg.

On Saturday, April 2nd, I showed my senior collection at 11am and 3pm. My song was Lydia by Highly Suspect and my choreography was pretty simple. During the song Gabby would untie her skirt from around her waist transferring her look from a short draped dress to a floor length evening gown look. I have a few really awesome shots of her in action that I will post soon.

Overall I loved my collection. I got really lucky and my models were amazing people. They were always attentive, on time, excited, eager, good listeners, just the whole nine yards of awesomeness. They also all got along really well, which helped me because I was never stressing out about them or their looks. They all had the same eye makeup for the show, but the girls had red lips while the guys had their lips look as though they were sewn shut. I felt that without hair and makeup and accessories, the outfits could go very punk or very prim and proper. Which is one thing I loved about my looks. Drawing inspiration from bands like My Chemical Romance and then from the classic looks of French tailoring. I really liked playing with accessories and makeup to get the full effect. I like to think my models would make awesome characters in a MCR music video.

My aim was to have the guys have really similar styling but they little differences. For example, they all have different patterned socks and Dairius has a hat to add more black into his look. I wanted the girls to all be different with their styling. For the red and black dress I chose a simple gold ring and a men's pocket square to tie around her wrist. She also got black thigh highs with bows and black ankle boots. Gabby's look had a lot of patterns and my head piece I made in London, so I chose simple black triangle earrings and black heels reminiscent of the Spice Girls style. Megan's look has a Harley Quinn feel to it so I gave her one white glove and some black and white striped earrings. Her heels are cutesy with the t-strap and little black bows, but they're covered in gold spikes for a more dangerous vibe. I am in love with how everything turned out and I can't imagine changing any of it. 

When I get the more professional pictures I'll post those, especially the action shots!

Fashion Show Shenanigans in Photos

Close up of Gabby's makeup.
One of my lovely models getting her
hair done in a faux Mohawk style.
 

Some of my guy models waiting
for their pictures to be taken.


A detail shot of Eric's black and white plaid trousers,
 striped socks, and punk shoes. 

Ready for the show!
Makeup inspiration was from the band
My Chemical Romance when they did
their "The Black Parade" album.

Model & Designer 

All lined up and ready for the show to start!
For the runway they would be entering from altering sides (left/right).
So the first 4 models in line enter from the left and
the second group of 4 enter from the right.

Thursday, March 10, 2016

Corsetry Progress


Pictured left is the corset after all of the side seams were sewn together. I was still debating on the zipper but in the end I chose an all black separating zipper for the front closure. There are no laces, it just zips on and off. Once I sewed the seams I pressed them open and then sewed the zipper. Then it was ready for a fitting to see how it fits over the dress.


Pictured right is the corset all sewn together with the zipper and on my mannequin over the dress for Gabby. I was pretty sure it looked to big but decided to wait for the fitting before changing anything. Also, I couldn't put the boning in before making sure it fit. However, I could have put the boning in the seams in which I wouldn't alter after the fitting. The 3 seams I alter are the center back and the 2 side seams. After the fitting I needed to take the corset in around 3 inches total. 

Pictured left is the corset after sewing twill tape down 4 of the seams to create a tunnel for the boning to go inside. I learned this method in my corsetry class at the London College of Fashion (LCF) and decided to use it for my more modernized corset instead of doing the run and fell seams. I am not using black twill tape for the entire insides. I've been debating on how to finish the other 5 seams, but I'm thinking as of now it'll be 2 red seams and 3 white seams. I'll be finishing the corset by hand sewing black twill tape along the top and bottom. I may be taking the corset with me to France to do some hand sewing while in the airport, but that's not set in stone since I haven't packed yet and don't know how heavy my bags will be. We shall see :)

Monday, February 29, 2016

Senior Collection & More!

My Shot for the Program.
Hello Everyone!

The fashion show is 33 days from now and I'm not freaking out at all, which is slightly surprising. I have a model practice tonight and I'll be able to see my line up and see how everyone's patterns look together. I'll also get to see the fit again and if I need to make tiny alterations. I'm pretty excited to see the clothes and shoes and what I've done so far come together. As of now I still have to cut & sew 1 pair of pants and 1 corset. Besides that everything is already cut and in the process of being completed. My goal is still to have everything done before spring break, which is in 12 days. 

Besides my senior collection I'm proud to announce that I've landed an amazing job for part of the summer. I will start late April and work until mid June at the Opera Theatre of Saint Louis at a 1st Hand. I'm really excited and can't wait to start! I'll be working on 4 productions and I'll get to do little apprenticeship type classes- millinery is 1 of them! But I think it's a wonderful opportunity and I did everything to make sure I could accept it, which included getting permission from all of my professors to spend the last 3 weeks (including exam week) off campus. I'm very lucky to have their approval and I can't wait to share my progress and projects! So stay tuned for some really awesome things!

Wednesday, February 24, 2016

Womenswear Progress

Work in progress: striped dress
with zipper detail.
I have 3 female models for my senior collection and since all my male models are wearing pants I figured I should make some different types of skirts or dresses for my looks. One model is in a skirt, one a short dress, and one a long dress. The dress pictured to the right is the same material as one of the men's shirts and has a zipper down the front. It's a stretch knit so the zipper isn't there for function but for fun. I wanted to break up the all over stripes look and I also plan on adding black rib knit to the collar and around the armholes so it'll connect the all over look. I'm really looking forward to seeing the whole look together with hair and makeup and shoes. 

Menswear Progress

Close up of hand sewing one cuff.
Last semester I made 4 menswear looks and this semester I'm only working on one menswear look. The look for this semester consists of a pair of black wool trousers with suede down the side seams and a color blocked t-shirt. The bottom half of the shirt is a black and white plaid, which was used for a pair of men's pants last semester, and the top half is a black cotton. For the collar and cuffs I chose a grey knit to kind of break up all the black and also add another texture into the look. Instead of focusing on elaborate and over the top designs and focus on simpler silhouettes but mixing textures and patterns. I'm pretty happy with the results so far and I can't wait to see it all come together! I have a model practice next week with all 8 of my models and I can't wait to see them all in their looks (what I've gotten done so far) and see how the outfits look all together instead of just individual pieces.