My online portfolio: Malotke Designs.

Thursday, December 31, 2015

Classic Inspiration

Classic Inspiration

Classic Inspiration by brimalotke


As a new year starts many people would claim to want to become a "new you" but not me. I'd really just want to be a better me, I am perfectly content with how I am and I really just want to improve. For example, make a little more me time to relax and do things like painting my nails and making time to hang out with friends. Also just making myself go to the gym and get back into boxing. But fashion wise I love where I am in my sense of style and where I'm progressing. I'm not hanging on to things like I used to, when it's torn and all messed up I get rid of it. I do want to get all my stuff together and get organized and try to scale down my wardrobe. I don't know where I'll be after graduation so I want to have the essentials and the classics, like a little black dress and a suit that fits perfectly. I'll be drawing inspiration from timeless pieces and figures like Audrey Hepburn and her characters in some of my favorite movies. I figure once I'm settled and have a job I can alter my wardrobe accordingly. Let's see how this goes- the whole cleaning out my closet for REAL and getting rid of things I've had forever but don't wear.

2015 in Review

This year has been a whirlwind of amazing times for me. Of course there's been some not so wonderful times, but I've done so much this year it's hard to believe it.
In January I headed off to London for a semester abroad at the London College of Fashion. I made some friends and got to travel to other great places like Scotland and Paris. When I came home I got to see my school's fashion show and my friend model my sustainability piece. 
A collar I patterned, sewed, and stitched
on an apron for "Hay Fever."
Then I was off for the summer to Illinois where I interned with the Champaign Urbana Theatre Company and got to help out on a few shows for my boss and her freelance costume design jobs. I was also lucky enough to land an internship for Fashion A Magazine and have been writing for them and doing social media posts since June.
In August I started my last year at Purdue and began working on my senior collection that will be shown on April2nd, 2016. I interned with the Purdue Costume Shop again this fall and was even lucky enough t be he costume designer for a small production. It was wonderful! I've finished the year with seeing John Oliver in Chicago and getting to spend some quality time with family. I'm really looking forward to this coming year, mainly the whole graduating college part but who knows what will happen after that!
 
Goodbye 2015 & Hello 2016!
 
Enjoying tea time in London at Sketch.


Thursday, December 24, 2015

"As You Like It" Show Pictures

I'm pretty happy that I finally got some show pictures of the dress I made in action. If you want to read about the construction of the dress I made for "As You Like It" then check out my earlier pieces "Costume Update!," "Costume Bodice Progress," "Costumes: Bodice Details," and "Costume: Bodice & Skirt." 


I got to create the dress using the designer's sketch to drape a mock up and then after a fitting I was able to finalize the plans and edit the patterns. I made the skirt with box pleats and the boned bodice has piping around all the edges that I also made. I didn't make the bloomers, the petticoat did happen to be the one I had made the previous year int he costume shop but both the petticoat and bloomers were pulled for the look. I did however make a new hip pad specifically for the actress. 


It was pretty neat to actually make so much for the show. I love that I got to make a whole look as well, it was a great experience and I learned a lot. I've also added some of the show pictures to my online portfolio: Malotke Designs.


Tuesday, December 22, 2015

"Herschel: Make Yourself Useful"

Caroline Introducing herself.
Finally some pictures from "The Hoes Progress" where I was the costume designer for the half "Herschel: Make Yourself Useful."
Caroline & William on their way to Bath, England.


William transforming into
himself from a stage hand.
Discovering stars and more!

Wednesday, December 9, 2015

First Look for the Show

All of my looks were due this past Monday and I managed to finish everything on time. I decided to do a little post about each one.

For my first look I made a pair of plaid trouser pants that have 2 front tucks and a plain black zipper. The shirt is a long sleeve white button down with a black collar and cuffs. I chose to make the buttonholes black as well to make the overall look more interesting. I am in love with my black and white buttons and chose to use them for everything except the shirt has a small white button up by the collar.


Overall I love the look and I am really looking forward to making the blazer for it next semester. It will be a lot of work but my goal is to create the perfect tailored blazer.

How to Keep Your Androgynous Style Over the Holidays

Holiday Style

Holiday Style by brimalotke

It’s hard not to feel festive when there’s a variety of holidays happening this season. If you’re going home to visit family you might be expected to alter your appearance slightly or not. Either way, if you love your style to be more on the androgynous side of fashion, then this look is for you.
To read more check out the full article on Fashion A.

Wednesday, December 2, 2015

Holiday Date: Androgyny Style

Holiday Date: Androgyny Style

Holiday Date: Androgyny Style by brimalotke

For the holiday season it might get tricky trying to figure out what to wear when it’s freezing or you need to be prepared for different types of weather. I chose to focus on comfort, layers, and a classic look for this androgynous holiday date look.

To read the full piece then check out Fashion A.

Thursday, November 26, 2015

Winter Boots

Accessories When You're Chilly

Accessories When You're Chilly

Accessories When You're Chilly by brimalotke

Already added a nice winter coat and thicker socks but you're still cold?? Try these simple accessories that will keep you warm on those chilly winter days. Read all about them on Fashion A,

Tuesday, November 24, 2015

Burlesque Fashion Illustration

 For my fashion illustration class we're working on our final project. For the project we're supposed to design 10 looks, front and back (so 20 figures), and have inspiration and other related boards to go with our presentation. For my final project I decided to do something insanely fun and different from my previous work. I chose to do a burlesque theme for my designs and so far I'm really loving it! I only have a few done so far and I'll need to scan them into the computer and do some work, such as adding solid colors for skin and hair and then adding fabrics and shading to the clothing.
I'll be sure to add more when it's closer to the due date and my project is further along. Inspiration wise so far I'm rolling with the classic burlesque shows such as the martini glass and sailor inspired ensembles. I'm hoping to add some that ooze Hollywood glamour as well. So stay tuned!! 

Monday, November 23, 2015

Color Therapy

Color Therapy

Color Therapy & the meaning behind some of this fall's top colors.

Check out my article on Fashion A!

Fall to Winter

Fall to Winter

Fall to Winter by brimalotke

Mainly the 2 keys to taking your wardrobe from fall to winter are layering up and choosing heavier fabrics for your accessories like scarves or socks.
If you're interested in reading more then head over to my full article on Fashion A Magazine!

Friday, November 20, 2015

Costume: Bodice & Skirt


To finish the bodice I cut bias strips of a paisley type fabric and with cording made piping to go around the edges of the bodice. I then sewed the piping on and hand basted the unfinished side to the bodice. 

Skirt wise I had done the math to find the number of pleats necessary and such for her waist measurement. After marking the corduroy I pinned it all and then sewed the pleats. I then sewed on a grograin ribbon waistband and it was ready for the fitting with the actress.

In the fitting we found out the designer wanted a higher and more cinched in waist, which resulted in me taking in the back of the bodice quite a bit and also moving where the snaps would go on the skirt for closures. I also marked the hem line for the skirt. 
After the fitting I was able to take in the bodice, finish all of the work on the bodice, mark and cut the skirt hem, use the blind hemmer on the skirt, and then put hook and bar taping in the back of the bodice. One of the last steps was cross stitching the skirt and bodice together so that it would be a dress. 
I will be attending the play this weekend and I am looking forward to seeing the costume in action. I had made the petticoat last year in my internship, I made the hip pad for her, and I made the dress from "scratch." I draped, patterned, cut fabric, and sewed all of the pieces together. I even used the grinder in the scene shop to grind down the boning for the bodice. This costume was essentially all done by me (minus the design of course but this was for work int he shop).
Overall I love it and I am just looking forward to seeing the show and seeing her in full character! Hopefully I'll get some good pictures to share and to use in my portfolio!

Costumes: Bodice Details

For the costume shop I draped a bodice for a character in "As You Like It." So here's a little bit more on the process. I have previously written about my beginning with the bodice in "Costume Bodice Progress." I realize that was forever ago, so this one might be a little long and I'll try to break it up. 
Pictured left is after I had taken my patterns and cut them out of coutille. I laid those pieces onto my corduroy so that I could trace and cut the pieces out. After cutting out all of my pieces I was able to sew the pieces of taping to where I had marked it out on the coutille. After the boning taping was in place I then had to flat line them, as in sew all of the pieces together about 1/4" away from the sew line.
Next I would sew the center front to the side front pieces and the the back pieces to the side back pieces, leaving the side seams and center back untouched. Lastly I sewed the straps on and made sure all of my seams were pressed. I would hand baste the side seams together for the fitting so that if there needed to be changes it could be done easily and efficiently. I also put the boning in and hand stitched the bottoms shut, enclosing the boning. You can see the inside of the bodice to the right before the boning was placed in the bodice.


Staying Inside? Stay Busy

Staying Inside? Stay Busy

Staying Inside? Stay Busy by brimalotke

Hey, thinking of spending some lazy time inside? Instead of feeling like a total bum you should try some new things! Or not new, but just fun :)
You can check out my article on Fashion A about some awesome ideas to do when you opt to stay in and stay cozy and warm.

Saturday, November 7, 2015

Life in a Paragraph

I've been so busy lately with school and my 2 internships (Costume and Fashion A Magazine) on top of my jobs to really focus on my blog. The next couple of weeks will be insane but after that I will have plenty of time to write for myself on my blog and post a LOT of costume related pictures with tutorials and explanations and such. So get ready for awesomeness coming around the beginning of December!

Sunday, November 1, 2015

Leather & Grey

Leather & Grey

I was originally going to write a piece for Fashion A Magazine on the wonderful look of leather and grey but I figured I'd try to write more on my blog for now. 
Check out my full article for Fashion A.

As of now I am loving the weather and how it's starting to be perfect jacket weather. One great staple piece to own is a leather jacket, however mixing it up and taking on a nontraditional leather jacket is a great idea. What I love about the ones pictured above is the variety within using very similar materials.Even within the textiles there are different shades of grey and you can almost feel them from the pictures. One typical thing of wool and leather jacket combinations is that the sleeves will be leather and the body will be wool. I did include an all grey, no leather version for those who may want a more loosely fitted and non leather option. You can chose a simplistic one or one with a lot of detailing and stitching featured. It's all up to you, but I would definitely look into something like these if you're considering a new jacket choice for the fall and winter seasons.

Monday, October 26, 2015

Wednesday, October 21, 2015

October Fashion: Halloween Theme

October Fashion

October Fashion by brimalotke

Check out how to incorporate some Halloween spirit into your wardrobe on FashionA!

Pink Look 4

Pink Look 4

Pink Look 4 by brimalotke 
Check out my article on FashionA about another way to wear pink to show your support!

Monday, October 12, 2015

Beetlejuice Inspired Fashion

Beetlejuice Inspired Fashion

Beetlejuice Inspired Fashion by brimalotke

Check out my article on Beetlejuice inspired fashion for both Halloween and everyday wear on FashionA!

Friday, October 9, 2015

The Witching Hour

The Witching Hour

The Witching Hour by brimalotke

Fall is my favorite season during the year and probably my favorite time is around Halloween. It's just magical. I really just wanted to share some fashion that can be Halloweeny but you can wear throughout the year. Check it out on Fashion A!

Wednesday, October 7, 2015

Costume Bodice Progress

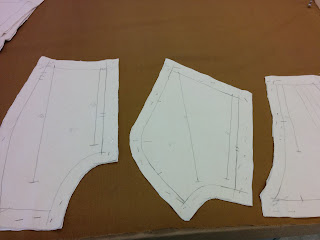
On Tuesday in the shop I got to take the notes from the fitting we had on Friday and make the adjustments to my patterns. There were only a few small changes made; see the taped areas, those are the new additions. I trued my lines up and got to make the final changes. The pink lines are where the boning will be added. I got to go through a few books and do some research on how they did the lines for boning from the 1830s. I got to have a lot of say in where the boning should go and working with my boss we came up with the lines shown in the picture. I'm pretty excited to see how the bodice turns out. I cut out the new pattern pieces out of coutille and on Thursday I should be cutting the pieces out in flannel and hopefully corduroy as well. The end game is to sew the boning to one layer and then all 3 layers together before piecing the bodice together. This allows the bodice to be easier to modify and alter in the future. I'll post more after I have more done.

Monday, October 5, 2015

Army Green Variety

Army Green Variety

Army Green Variety by brimalotke 

All about army green jackets that aren't your typical military style layer; on Fashion A.

Menswear Fittings Part 1

Today I had my first fitting for my senior collection! I had two of my male models come in and try on their muslin mock ups for fit. My first model is wearing a button down shirt with trousers and a suit jacket (pictured in muslin to the left). My second model is wearing a t-shirt, trousers, and a cool band style jacket (think My Chemical Romance's The Black Parade look).

Both outfits had a couple little problems, mainly when I drafted all my patterns (that's right all drafted none draped) I didn't drop the armhole enough so I just need to bring it down about an inch or so on each upper body piece. Besides that it was just minor things like a too short sleeve or too long hem allowance on a shirt. All things I can easily adjust.

My other 2 male models for the semester will be coming in this Wednesday so I'll have their looks done in muslin and hopefully have less adjustments to make. So far I'm happy with how things have turned out and I'm really excited about all of my fabrics I've gotten for the collection. I'll definitely be posting more on everything once I start the looks in fashion fabric.

Sunday, October 4, 2015

Costume Update!


I'll be posting more on the individual projects I've worked on in the shop but since I just had my 1st fitting for "As You Like It" I wanted to write a little about that costume. For the character "Audrey"I needed a hip pad and since none of the ones in stock had the right look I made one. As for the skirt I started out draping it in muslin and then after the fabric had been washed and dyed, I just did the pleating through math and marking it on the fabric. Then created the box pleats and sewed the waistband on the skirt. 

For the fitting I had the canvas muslin bodice, petticoat, hip pad, and then corduroy skirt. The alterations needed are to take in the petticoat, attach snaps or hooks for the hip pad, finish the skirt with fasteners, and then to take in the bodice when I go to make it out of the corduroy. The final step will be sewing the skirt and bodice together to make the dress. Overall I'm really happy with the outcome so far and I'm glad my first legit fitting with the shop went so well.