My online portfolio: Malotke Designs.

Tuesday, July 3, 2018

New Blog

I have decided that I have not kept up with this blog as frequently as I had hoped. I started it my senior year of high school and was never able to give it the attention it deserved. My posts are sporadic and all over the place. I have decided I can dedicate time and energy to a blog right now and because of that have opted to start fresh. I will no longer post on this blog. 

Starting from scratch, I will be working on a completely new blog. My new blog is Malotke Sews. It is more about my process as being a Costume Designer. The blog is more progress oriented and less just inspiration based. I hope you continue to read my new blog, but enjoy the few years I have spent on this one. 

Thank you for reading!

-Brianna Malotke

Monday, June 4, 2018

Aspen Tank Pattern Testing

Usually I make my own patterns and avoid using commercial patterns. I prefer making sure everything fits the way I want it to and then I don't need to make alterations like I do with commercial patterns. Plus, it's fun to drape and pattern from scratch. But I'm looking to expand my wardrobe and try to make more practical clothing that I'll wear instead of just fancy things that sit in my closet. 

I've been trying to be more involved in a sewing community, especially since I'm in between costuming projects (my latest show doesn't open until September). So I joined Seen & Sewn's Pattern Testers group and tested out the Aspen Tank

Here is my progress:


I am a fabric hoarder and love buying fabric even if I don't have a set plan for it. So after getting the Aspen Tank pattern I decided that the striped fabric I had been playing around with draping would be perfect. 


After cutting out the pattern pieces, taping them together, I started to pin the pieces. It's a super easy pattern, just 3 pieces if you decide to do it without sleeves (which I did). Just a front bodice, back bodice, and bottom piece. Usually with patterns I like to line everything up, but with this I wasn't too worried and figured the stripes would look great not lined up. 


I made the front and back bodice with vertical stripes and did the bottom with the stripes horizontal. It's a nice pattern because, based on your size you need less than 2 yards, which is perfect if you like using remnants like me.

I made a Large even though some of my measurements fell into the X-Large range.


Now another change I made was opting for double fold bias tape because I wanted the arm holes and neckline to be outlined in a solid color. Plus, it added a nice clean line around the bodice. Pictured left is me adding the bias tape.


Pictured right is my final bodice in play. It's perfect for the summer. Lightweight and comfortable. I have to wear a sweater to make it more professional for work, but it's great by itself with jean shorts for this summer weather we've been having.

I would recommended this pattern to anyone looking for a fun summer top! It's a nice flowy option, so depending on how heavy your fabric is it's great for the hot weather. As of now I am planning to remake this top with a different fabric for another fun summer option. If you're interested in giving it a shot check out Seen & Sewn Patterns.


Monday, August 28, 2017

Cozy Studio Space

Cozy Studio Space

Cozy Studio Space by brimalotke


One thing I can't wait to do is live in a house where I have my own space to decorate and make my own. I look forward to having my own studio where I can have enough room for a desk with space for my sewing machines and room to sketch and make designs. I need room for bookcases and a cozy spot to read. 
Textures and colors are necessary for me to be happy :) I love mixing patterns, textures, fabrics, just combining all the differences for a great sensory feeling. With all of this going on it will be a hub for creativity, but also provide room to relax and unwind. 
Right now I share a study with my fiance, which means half of the room is fabric and art supplies while the other side is computer parts and cables. When we find a place to own I'll definitely make sure I have a whole room to transform into a one of a kind studio. 

Saturday, August 26, 2017

Costume Design for a Cast of 40+

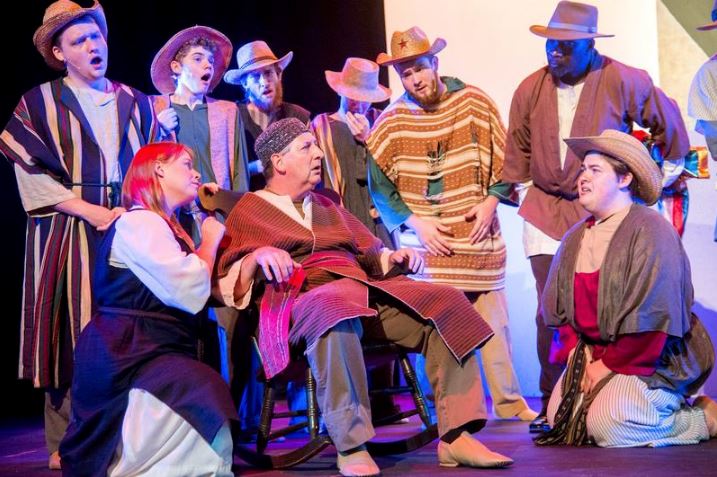
Sorry for the lack of posts recently, I have been very swamped the past few months with a huge costume design project. I was lucky enough to get to be the Costume Designer for "Joseph & The Amazing Technicolor Dreamcoat" for the Champaign-Urbana Theater Company. With a budget of $500, two months, and a cast of over 40, I needed to make this production come to life. 

I had a lot of fun working on the show, especially making the dancers' looks. I'm going to try to post some progress pictures for the pieces I made from scratch. I loved working with quick changes, multiple costume changes, and a cast this large. My first show as a designer I only had 2 actors (they played all of the characters of course) to work with, so this was quite a step up from that show. I look forward to working on more shows like this in the future. I was very thankful to have a few people help work on some pieces for the show and to have some help backstage for changes and costume needs.

Stay tuned for more pictures! You can always check out my portfolio for more pictures too!

Ensemble in motion.

Close up of the Pharaoh's cape while backstage.
  
During "One More Angel," we had a hoedown feel to the cast.

Monday, February 20, 2017

Shoes & Flowers

Shoes and Flowers


Shoes and Flowers by brimalotke 

I love oxfords/brogues/
loafers/ and any form of these classic styles. When I was in London studying abroad at the London College of fashion I took a Shoe Design class where I focused on looking more into men's shoes and working between a balance of femininity and masculinity. I designed a line of men's shoes inspired by the story "The Princess & The Pea." I love the blending of structure (typically associated with masculinity) and flowing lines (in this case the floral details or touches or colors). I am loving these combinations in the shoes pictured above. I may be rambling, but these styles are just classic and perfect for any wardrobe. You could pair them with jeans, a button down, and a blazer for a more professional yet casual look. Or you could try a tailored dress, sweater, and fun jewelry for a more dressed up style. Really, to me, the limits are endless and could work for any different style.

Sunday, February 19, 2017

Mannequins and Media

Close up of pattern
and necklace.
I haven't been taking as many pictures at work of mannequins I've dressed but here is one of my favorites. It's a simple little black dress paired with a lovely pink and black coat. If the coat was my size it would be hanging in my closet right now. I decided to keep the accessories minimal and go with a black and silver necklace (reminiscent of costume jewelry), a black and silver clutch, and pink heels. The outfit is elegant, simple, and easily molded into anyone's wardrobe. I like the pieces individually and think they could work well with other pieces in your everyday wardrobe. For example, the dress could be paired with boots and a sweater for a more casual vibe or the heels and other accessories could be worn with jeans and a tee to dress up a go to outfit. 

As for social media posting with the displays, I haven't quite done a blog piece with any type of "final" piece that I've posted to the work account. To the right is one of the posts I've done and uploaded to my work's Instagram (and other platforms). It features the outfit of the day and a few Parisian cafe and pastel images I drew inspiration from on Pinterest. It's a very "Me" post with the pastels and French inspiration, but the outfit is not really my typical style. I like working with pieces I would never wear (i.e. crop tops) because I think it helps me think outside of my comfort zone for styling. I can't really dress all the mannequins in black and white and lots of patterns. I try to work with more styles I'm not typically drawn to so that I can expand my ideas of the different fashion styles and what works together in my mind for future combinations. I will miss all of the access to different styles when I leave.

I will try to keep track of the displays I change in the next few weeks for a nice ending to this mini series. I will be leaving my current work place for a new adventure in the beginning of march and can't wait to see what happens! I'm still surprised with my success at expanding out of fashion into costumes and into marketing. Not 100% set on my "ideal career" but experience never hurts so I'm excited to see what plays out. If anything I'll have more time for my sewing projects and hopefully build my portfolio more.

Thursday, February 16, 2017

For the Love of Stripes

Stripes
Stripes by brimalotke

I'm never entirely sure what my so called style type is but I do know one thing, it includes a lot of stripes. I recently snagged an amazing job opportunity (YAY!) and it's a more professional setting than my current employment. It needs business casual attire and every now and then I'll need more business dress as well. While some may think "Oh man I have to give up jeans and a flannel for chiffon and khakis," I'm super excited. There is a whole section of my closet that never see the light of day and I can't wait to explore the way to pair my fashion sense with the typical business wear. As of now I have about 4 button down tops that are various combinations of black and white and would work perfectly with dress pants or a nice skirt. It's weird to think how easily and excitedly I am to give up super casual dress to dress up but I am really looking forward to it. 

Plus... I just bought a new padfolio and while I was originally thinking pink, my boyfriend pointed out it wouldn't be me unless it was black and white striped. So of course I found and purchased a black and white striped padfolio. Just one way to incorporate how I like to express myself with fashion into this new realm of employment. I think I'm ready to conquer any business meeting or future business adventure. :)

Thursday, January 26, 2017

Old Hollywood Glamour

Always Learning

Besides working as a shift manager I also handle social media and product description writing for a stationery company. One of the main things I do daily is organize content and post on the different platforms. This week I attended a webinar over how to use Pinterest for your business. While it was very helpful, I also learned about a website that provides images, templates, and more to create amazing visuals that you can then use for what ever you want. Some of the features cost money but there are a lot of great ones for free. 

I wanted to share one of the images I've created using Canva (the graphic design website) that incorporates stock images, great colors, and a product image from Lemon Tree. It's a simple website to use and it's very handy since it allows you to combine your own images with free (or paid) images and accents such as backgrounds, illustrations, templates, and more. I will definitely continue to create social media images using Canva and will explore the other types of images as well (think info graphics, ads, and cards). 

While I enjoy Photoshop and Illustrator, I think Canva has a slight advantage with the templates and provided inspiration. Stay tuned for more great images! I may try to start creating some for my own use with design and promoting my apparel design work.

Tuesday, January 24, 2017

Denim Jacket Update


Progress Picture.
Whenever I have some free time I try really hard to work on the many projects I've started and stopped. A while ago I had purchased some more patches for my jean jacket, however they've just been sitting around waiting to be ironed. Since I don't work until later today I decided why not add some more patches to my jacket?! So I put a Harley Quinn patch on the bottom left with a "KAPOW" patch right next to it that has a little Batman symbol inside the "O."

Front right pocket.
Then I added a "KABOOM!" patch on the right pocket flap. I had gotten a set of 6 little patches similar to these 2 so I plan on using at least a 3rd one for the jacket. I may save the others for future projects. When I had started this project I looked through all of my sewing stuff to see if I had an patches before going out to buy some. I only had a packet of 2 little green flowers. I figured since I've had them forever I might as well use 1 of them, so I placed it on the flap with the "KABOOM!" patch. I think it looks pretty neat for the front. I haven't decided on purchasing nay others as of now or where to put the other little ones I already have ready to go. I'm pretty excited about the progress so far and I look forward to coming up with new ways to alter this jean jacket. I am considering putting a lining in (minus the sleeves) for some more color/pattern. We'll see what happens!

Wednesday, January 18, 2017

Grown Up Accessories

Loving the new purse.
One of the things I decided I would try to stick to this year was only using what I get from the store for my own purchases. To elaborate, we have a points system that lets you earn stickers. Each sticker is a $1 of store credit, who ever gets the most is then employee of the month and if you win you get an additional $10 and a 40% bin which you can fill and hold for a week. I've won 4 times now, and I usually spend more than I should when I get to hold a bin. So for December I had received $31 in store credit from stickers, and since I had won the gift card sales I had a $25 gift card to the store as well as $42 cash from the store ($1 for every gift card sale). Being me I was definitely going to spend it all on clothes, because why not? :) 

However I decided to try and just get a few really nice items instead of getting a full bin. This is how I came about getting a lovely yellow Kate Spade purse basically for free. Our store priced it at $65 and we're not allowed to use any discount on designer items (you can use your employee one after 1 week though) so I decided to pay full price. I used all of my stickers, my gift card, and then used the cash they had given me. 

All in all I definitely think it was worth it. It's not everyday you get a designer purse for free. Also it's a very classic style and while I'm not a huge fan of yellow it goes pretty well with my wardrobe (which continues to surprise me). I had purchased a hot pink Kate Spade wallet a few weeks ago and it doesn't match but I love the two together.

Getting Funky with Displays

I figured I would add some more pictures of displays I've done at work. I'll add some of the walls I've decorated (which have multiple mannequins compared to just doing the outfit of the day one) when I get a chance to snag some neat pictures. I'm not sure if I'm allowed to just take the pictures off the Instagram account or not so I'm going to ask first and then I'll do some posts about the work I do for the shop's Instagram account & posting for them.
For the look on the left I wanted to do a larger size despite the mannequins being basically a size 0. So I pulled the printed long sleeve dress from the larger sizes, added an XL pink fur vest, and then focused on accessories. I wanted a little bit of shine with 2 simple necklaces and then another pattern & texture with the silver snakeskin clutch. The heels are plain black but lace up and have cool cut outs.


For the look on the right I really wanted to do something more "funky" than before. I chose a long sleeve maroon velvet leotard that has a deep v down the front with strips across. Then found a great pair of textured skinny leg trouser pants to go with the leotard. I decided on all black for accessories since the leotard is bright and the pants have many colors in them. I topped the look off with a loose blazer, black and gold purse, and platform oxfords. I'm probably going to end up buying the shoes because I am in love with them. I own a silver pair but these are too cool to miss out on owning and wearing.

A close up of the shoes!

New Year New Outfit Goals


One of the things I've decided to work on this year is dressing up a little bit more for work. Whether it's actually wearing the shoes I own (I tend to wear the same 2 pairs to work because I know they won't hurt my feet after 8 hours) or trying to add a little lipstick and jewelry to my "basic" look of jeans and a flannel. 
Pictured above is one of my more creative outfits. It's a long sleeve cotton black dress paired with very bold floral printed leggings and a pair of teal suede oxford flats. I also wore black/white striped earrings and bright pink lipstick. It was pretty dreary outside so this look helped me stay positive at work and feel pretty confident as well. Hopefully I'll start actually getting some decent photos of my own looks to post and write about.

Sunday, December 25, 2016

Adding Patterns!

Cutting triangles.
My denim jacket has 1 patch and a little extra stitching around it, but since I don't have any other patches at the moment, I decided to add something else to it. Being me I thought a little bit of a pattern would make this denim jacket really stand out. I went through my scrap bin to see if I had any that would work for the under collar of the jacket. Of course the piece that ended up working is a piece from my Senior Collection. The red, black, and white plaid fabric has the perfect amount of stretch to work with the denim (72% Cotton and 18% Polyester). Being me I didn't measure anything out, I just lined up the selvage with the collar, pinned it, and sewed along from the inside of the jacket. 

Pinning the remaining 3 edges.
After attaching the plaid to the jacket I cut a few triangles to give the fabric ease along the neckline. Adding an under collar to an already made piece isn't as easy as doing it in the proper order while making a jacket. Next I pinned the plaid to the collar so I could hand stitch it around the 3 edges. Surprisingly it didn't take very long and it turned out pretty well. You can't see the plaid unless the collar is up or turned wrong but I know it's there and I think it's a pretty great detail to my jacket. 
Finished Collar.

I'm considering adding a different plaid (because I have SO MUCH SCRAP FABRIC) to the cuffs so if I roll the sleeves up and button them you'll get some more pattern and color. Overall I'm pretty happy with the progress of my jacket. Hopefully I'll get some more patches within the next couple of weeks and i can continue adding to the jacket.

Denim Jacket: First Patch Down!

Ironed on, about to start stitching.

First patch on my denim jacket is complete! I started off my denim jacket project with just a vague idea of what I wanted the end result to be but it's already changed multiple times since I've begun this project. After purchasing the denim jacket from work I went to check out the iron on patch selection at Jo-Ann Fabric Store. I was slightly disappointed but ended up purchasing a Wonder Woman patch for my jacket. 

My project has just been in that state until today. That's the funny thing about Christmas time for me, I always get these bursts of energy to finish projects and start new things. So after our Christmas celebrations I figured why not work on the jacket. I ironed on the patch and then, wary of the corners, decided to hand stitch the corners down so it will survive being in the washer. 

Final picture of the patch
with stitching around it.
Originally I was thinking of using thick embroidery thread and stitching a few onomatopoeia words like "POW!" and "BAM!" around it but decided on a simple outline to highlight the patch. I'm putting the comic book references on the back burner until I get more patches for my jacket. I don't think it will be an entirely superhero themed jacket, but it may turn out that way depending on the patch selection when I go shopping. I have found a few online I think I'm going to buy and they're all movie references so it could turn out pretty neat (at least to me).

Wednesday, December 21, 2016

Denim and Patches

Denim and Patches

Denim and Patches by brimalotke featuring a denim jacket

I'm trying to decide if I want to go with a theme for my own personal denim jacket & patches project or if I should just whatever patches I like and end up buying. Currently I just have the 1 Wonder Woman patch and I want to do embroidery around each patch. I may just have to roll with it and get any patches I'm able to that I like.

Project Costs so far:
Denim Jacket from 2nd hand store= $7
Wonder Woman Patch from Jo-Ann= $4

A lot of patches I've seen that I've liked are around $8/patch so this may get a little expensive. However, if I get them one at a time over a few months and gradually just keep adding them on it won't feel like I'm spending so much on the project. Plus there will always be coupons, discounts, and hopefully some great end of the year sales!

Thursday, December 8, 2016

Dressing Mannequins at Work

When I open at my work I usually get to redress the main mannequin that we use as our "Outfit of the Day." It's what we use to showcase a cool look and then we post it to the Instagram. A lot of the time I do outfits I would wear so it brings variety to the store since each of us that works there has our own sense of style. Mine is a little bit of everything but I think it works pretty well. Most of the time I start my look by picking out the shoes and then going from there to construct the rest of the outfit. If there's something I've been debating about buying for myself I try to include it in the hopes that someone will see it and buy it (thus saving me money and room in my already very full closet). I've been doing this for a while but it's only been recently that I thought, "You know, I should be documenting these looks." I wasn't sure what to do with them, but it is a good idea of visual merchandising and styling so why not take a few pictures for records. The following are all the looks for the Outfit of the Day that I've done since I've been taking pictures of them.


For the first one I loved these black boots even though they're ridiculously tall for me to justify them as a reasonable purchase. I went from there using a two tone denim and a cozy striped top. You can't see the back of it but the back opens up and is a black and white polka dot. Then I chose a grey denim button up and a silver skull necklace to add layers. I really liked the mixing of materials (of course!) and the simple color scheme.


For this look I did choose the jacket first. I saw it, was disappointed it's too small for me, and then proceeded to think up a look that would be perfect for a more casual holiday dinner or party. The look consists of a funky  embroidered jacket, maroon cotton and lace long sleeve, and a pair of boyfriend jeans. For the accessories I chose a shiny black tote, cut out oxford flats, and a multi strand pearl necklace. I figured it was comfortable and casual, but still fun with the colors and printed jacket. 

This look is very me :) I wanted to pull from our "Mad for Plaid" wall and create something that someone shopping might not have considered putting together in a look. I started off with the black and white striped turtleneck and then snagged a pair of grey denim jeans with details on the knees. I paired it with a red and black checkered short sleeve jacket, 90s reminiscent black ankle boots, a BCBG black handbag, and a pair of white rimmed glasses. I really enjoy mixing patterns and I think this is a really good example of that.

Here's a look where I started with the shoes (my size and practical!) and then created a look around them. It's difficult to see the details at the neck but I started with a black and white gingham button up sleeveless top and then layered a sleeveless cotton dress over it that says "Aimer C'est Vivre" (To love is to live). Then I chose a comfy green cardigan for warmth and color and a silver and white necklace to top it all off. I figured someone would pair the look with leggings or tights to stay warm with the winter season.
Lastly, is my most recent look that is a little more funky. The buyers did a mall visit a few weeks ago and we were supposed to be deciding on what trends we saw that we thought would be most popular and what we should be watching for to buy or not to buy. I did start with the red suede shoes for this look but then I decided to go with some of the trends we were seeing in the other stores to create the rest of the look. The boyfriend jeans have a lot of patchwork and embroidery and the top has some sequined patches. I chose the red bomber jacket because we saw them everywhere and I thought the color was a perfect match for the ankle boots. To finish it off I chose a small rectangular cross-body in a neutral brown. It's not something I would probably wear together (I love the boots and jeans) but it pulled the trends we've been seeing together and it's a great color combination. Plus someone bought the jacket too!

I enjoy dressing the mannequins at work and I hope I'll be bale to keep creating some neat looks that work for the store and that I can write about at the same time.

Friday, December 2, 2016

Embroidered & Patch Jacket

For my job as a buyer at my work we needed to do a mall visit, take notes, read the trend reports, take a quiz, and in general just discuss what we were seeing in the different stores. One of the things I loved was the bomber jackets with patches. I like the variety in the different stores and I like the overall idea. It's fun and can work for different styles. However, I just can't find one that really speaks to me. I want to pick the patches and the colors and so now I'm making my own jacket. I am pretty busy at work so I'm not starting from scratch. Also since I prefer the jean jackets to bomber style, I picked up a dark wash jean jacket from work and am ready to transform it into something spectacular...or at least have a lot of fun trying new techniques. 

I snagged a Faded Glory dark wash denim jacket at work and then proceeded to check out what patches Joann's had in stock. I wasn't a huge fan of the selection but they've been having so many sales recently I don't blame them for the low amount. Plus, I really just wanted one to start with because I want to try and snag some online. I plan on distressing the collar and cuffs and potentially adding a lining (at least to the cuffs so if I roll them there's a pop of pattern). Anyone who has seen my work knows I love patterns so obviously I need to add more to this jacket than just patches. I don't want to go overboard, but I plan on adding some hand embroidery (or machine since mine can do that!) around some of the patches. 

I had a Batman patch but I used it for my graduation cap...so Wonder Woman is the start of my jacket progress. As usual we'll see what happens. I'm just happy to start another project and it'll be fun to wear it around and show off my personality with my jacket. I'll post progress pictures along the way and if I do the distressing I'll share the methods and maybe have a step-by-step guide as well.